CHIRP Programming Software
Fast, Free and Easy
Please send comments to:
K7CJS@arrl.net
Programming Your Channels with Chirp
CHIRP is a free tool for programming the channels on your amateur radio. It supports most brands and both mobile and handheld radios. It works on Windows 2000, XP, Vista, 7, 8, and 10, the latest version of Mac OS X (see Mac tips here), and Linux (see Linux tips here).
Programming Cable
You will need a special cable to connect your computer to your radio. You can find a Guide here on those cables. Many of them can be found at Amazon's Programming Cables. I would suggest the ones in the $20-ish range. Be sure to get the right one for your radio.
Downloading CHIRP Software
Start out by downloading and installing Chirp software. You can get the download here: Chirp.
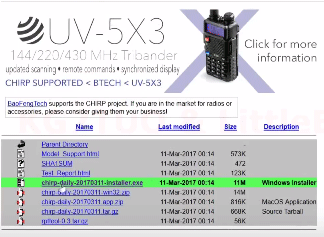
For Windows, the following screen will come up and you will pick the green highlighted file. Click on it and following the instructions to install it on your computer.
Download File From Radio to Computer
**MUST BE DONE BEFORE UPLOADING NEW OR EDITED FILE**
Note for Yaesu radios:There are series of steps that must be followed in order for Yaesu radios to be properly cloned. The above process is still accurate, but keep in mind the following:
The radio should already be in clone mode before clicking the OK button to initiate the download.
After clicking the OK button, you should press the button on your radio that initiates the clone transmission. This is usually indicated on the screen by Clone TX or similar.
To do this, in CHIRP, click on RADIO in your menu bar and select Download From Radio. This box will appear:
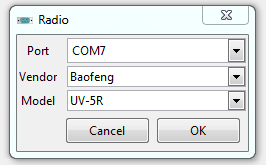
It's doubtful the box will contain the above text. You will have to change it to match your radio Vendor (Yaesu, etc.) and Model (7900, etc.). The choice of Ports can be a little harder. Click on the down arrow then pick one of the ports. In a second we will start the download. When we do it may say it can't find the Com POrt and you will have to go back and pick another Port from the list. Keep trying until you get the right one.
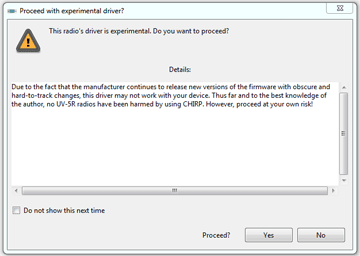
At some point the following box will appear. Ignore it and press YES unless you'd rather stop here and discontinue using CHIRP:
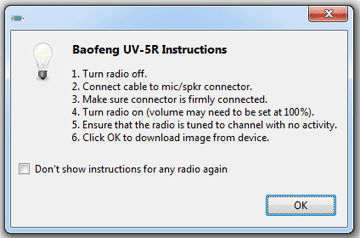
Another box will popup and give you instructions pertinent to your Radio - follow them and then click OK. Here's what the BaoFeng box looks like:
When the transfer starts you will see this box:
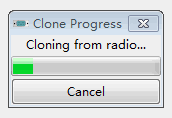
When it's done you will see the Chirp screen fill with any prior programming that is in the radio. If it's never been programmed it might be only one line. The file in CHIRP looks like a spreadsheet but it's not. It's called an Image file and ends in .IMG. Now we can do a couple of things: we can (1) upload an existing CHIRP file that you may have gotten from a friend or your local Ham Club, or (2) edit the existing programmed channels. Let's start with #1.
#1 Option: Load an Existing File
In CHIRP, select Menu then Open. Now locate the new .IMG file wherever you put it on your computer (downloaded from email, thumbdrive, etc.) and click on it to open it in CHIRP. CHIRP will now look like this:
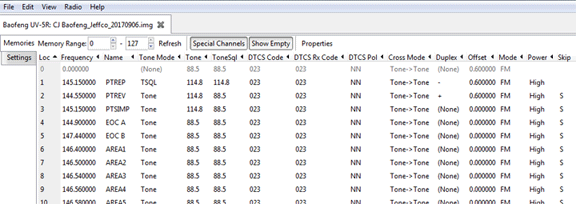
If you want to edit this file then go to #2 otherwise go to Upload to File Radio
#2 Option: Editing Existing File
Place your cursor wherever you want to edit something and type it in - editing is easy.
- Click on the LOC (channel number)number to highlight an entire row:
Edit: Cut, Copy, Delete, Move up or down. - Click on NAME to change the name displayed on your radio.
- SKIP: S = skip this channel during scans
- For other changes to the channel information see the column guide.
Your can also change your Radio start up message: go to SETTINGS then OTHER SETTINGS.
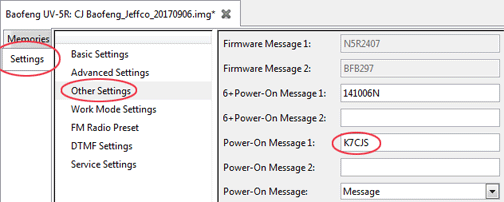
When done SAVE or SAVE AS the new, edited file. It's now ready to upload to your radio.
Upload File to Radio
With your image open, on the Menu Bar go to RADIO then UPLOAD TO RADIO.
You're all done - good luck!!
Tutorial courtesy of CJ - K7CJS. If you have any questions you can contact K7CJS at K7CJS@arrl.net.
Here's a short YouTube video that also explains it - it's a bit hokey but covers the basics: